When in doubt… SPRAY PAINT IT

It is my sunshine on a rainy day… It is the wind beneath my wings…. and yes, I would even go as far to say God must have spent a little more time on it. True, there are several things that I could place into these categories, but none as COLORFUL, as  INSPIRING, as…  The Spray Paint Aisle at Wal-Mart.

POP QUIZ: Can you find the SPRAY PAINTED items in this room????

Yes, there are few aisles at Wal-Mart I frequent more than the spray paint aisle (except MAYBE the aisle where they sell Miley Cyrus’s clothing line… but isn’t that everyone?? ). 

A $2.97 can of spray paint (and that’s the high-end of the price spectrum!) offers endless possibilities when it comes to art, decorating and recycling. That’s right… despite what the EPA may say, cans of aerosol spray paint are [sorta]GOOD for the environment! According to statistics, spray paint reduces the amount of garbage sent to landfills by 43.5% (kids & students out there… I would NOT use that statistic for any type of graded assignment).

Rather than throwing an item away, or passing by it at a yard sale, stop and ask yourself, “What if I SPRAY PAINTED IT”. With spray paint, you can…

  1. Make something old & dirty look new & pretty
  2. Change the color or finish of something so it coordinates with your existing decor… tying the whole room together! 🙂
  3. Cover up & prevent rust
  4. Add super neat-o crackle, hammered metal, and other textural effects
  5. Quickly paint unusual shaped objects
  6. Incorporate it into canvas paintings & other art projects

And now, the moment you’ve all been waiting for…. EXAMPLES:

I bought BOX LOADS of frames at the Mercy House for 50 cents/each and sprayed them with a HAMMERED finish.

My room needed a pop of color, but a collection of vintage family or sepia-tone photos would look great!

This "tree" candle holder use to be black, but it was too blahhhh for my dining room, until I SPRAY PAINTED IT!

Another candle holder that use to be boring black (Goodwill, $2). I painted it with the same hammered spray paint I used on the frames so it would coordinate in the room!

Spray paint some pine cones or potpourri to add some pizzazz!

Rather than painting these canvases green with acrylic paints and waiting for them to dry before moving on with the design, I evenly SPRAY PAINTED THEM!

One day I'll get around to adding pictures to this frame... but this is just an example of something that use to be super tacky and old-looking. Now it has "vintage charm" and adds a pop of color to my room!

I even SPRAY PAINTED my dog BLUE, transforming him into Babe the Blue Ox for Halloween! (Before you call PETA on me, it was hair spray paint, not the real stuff)

TASTY Homemade Potato Chips… from the MICROWAVE?!

Potato Chips. Homemade. Fat Free. Low-Cal. Tasty. Crispy. Delicious. Sound too good to be true?! ITS NOT.

I stumbled upon this idea while looking for activities to do with the children at work during “Food, Fun & Fitness Month”. At first I thought “crispy potato chips… in the microwave?? Get outta here!”  I probably would never have tried making them, if it weren’t for the reviews (and I was pretty desperate for an activity!)

Whether you want a snack, or something to do with the kids, here’s why you should DEFINITELY try this:

  1. They actually taste good!! They’re comparable to the homemade chips & dips at the Ham’s Restaurant.
  2. They’re low-cal and fat-free! You really don’t need to add any oil
  3. No mysterious additives …just potatoes and seasoning
  4. You can season them however you want!
  5. Won’t break your budget

Here’s what you’ll need:

  1. Potatoes
  2. Seasonings (old bay, salt, pepper, garlic powder, seasoning salt… a few of my favs)
  3. Microwave
  4. Mandolin Slicer (or someway to cut the potatoes as paper-thin as possible)
  5. Parchment Paper or Bacon Tray (I prefer using a bacon tray!)
  6. Time (Each batch takes ~5 minutes and unless you have some crazy commercial microwave, you can only do small batches at a time)

Here’s what you’ll do:

  1. Wash the potatoes & cut out the bad spots (you can leave skins on)
  2. Slice the potatoes as paper-thin as possible
  3. Spread the potatoes out on the parchment paper or bacon tray. Its okay if the edges touch, but don’t overlap.
  4. Sprinkle lightly with salt or desired seasonings (you really only need to season one side of the chips)
  5. Microwave on high for 2-5 minutes? This is the trickiest part of the recipe. You want to cook them until they START TO TURN GOLDEN BROWN in the center. The longer they cook, the browner they’ll become… and they won’t taste as good. However, if you under cook them they will be limp and less potato-chip-like. Theres a fine line between under and over cooked.… that’s the secret!
  6. Remove from the microwave. They’ll become a little crispier as they cool down.
  7. ENJOY! Try experimenting with other spices and seasonings… as with anything, dipping them in Ranch is scrumptious!

3D Foam Paint for “Big Kids”

If anyone tries to tell you that you can’t make lovely expensive-looking art (I’m talking TJ-Max and Ross worthy!) using Shaving cream and White School Glue… SLAP THEM SILLY AND SHOW THEM THIS:

Yea, okay…. it’s not that great. I messed up. Got angry….and its been sitting amongst other half-done projects and craft clutter in my spare bedroom (which also houses a shrine to my husband’s high school baseball career).

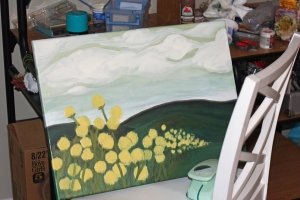
NONETHELESS, if you’re into painting (and you don’t have to be a good painter to create good paintings!) then you should definitely try using the recipe I posted for 3D Foam paint! I used it to create fluffy whimsical clouds and textured wild flowers:

Like I said, I messed up and will probably never finish this painting… note the bottom left corner of the painting. I tried to paint non-3D stems over the 3D puffy flowers… obviously, this does not work. I probably could have recovered from this blunder and finished the painting, except I’m stubborn as a dirty mule.

But you can learn from MY mistakes and experiment on your own. Try using different ratios of shaving cream, glue & paint.

3D Foam Paint for Kids!

At my afterschool program this is one of our favorite projects to do… (yes, there is some mess involved, but if I can manage with a room full of ten 4-6 y/os, AFTER they’ve been cooped up in school of 8 hours, you and your home should survive!)


By the way, this is not only a fun craft, but it is WASHABLE and can be used by children of ALL AGES. I used this paint to add texture to the painting pictured here. It’s great for clouds! For more information on using this recipe for “real paintings”, check out 3D Paint for “Big Kids”.

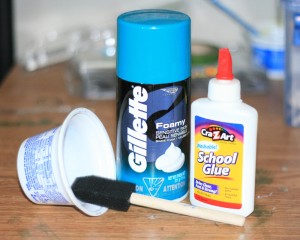
To create this FOAMTASTIC paint, you will need these items:

Shaving Cream, White School Glue, Foam Brush, Cup or Bowl

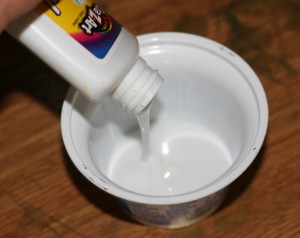
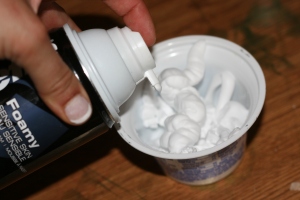
STEP ONE: Cover bottom of container with a layer of glueNote: The original recipe calls for “Half Glue, Half Shaving Cream”. BUT, after you squirt out shaving cream it almost doubles in size, so how would you measure it?? 

STEP TWO: Cover the layer of glue with a layer of shaving cream. That is my way of estimating “half and half”.  Adding MORE or LESS shaving cream won’t ruin anything, it just creates different consistencies and textures.


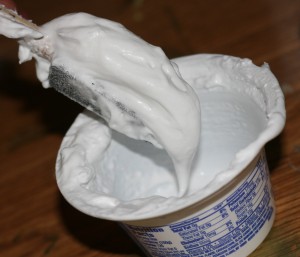
STEP THREE: Mix it up… and you’re ready to paint! Mixing it up with a popsicle stick or something other than the foam brush you will later paint with, may cut down on some mess.

 Here are some ideas on what you can do with your 3D Foam Paint:

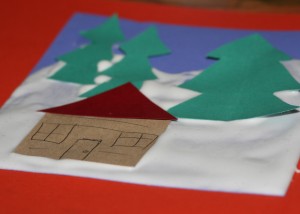
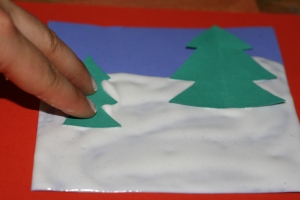
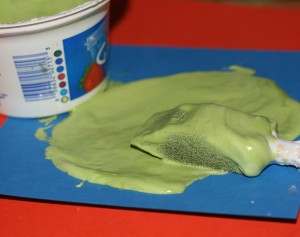
First of all, EATING IT is never a good idea… no matter how appetizing it looks. Make a scenic picture by pressing shapes into the paint before it dries. White foam is great for snow pictures.  You can also create blue ocean scenes or grassy hills by adding tempera or acrylic paint to the shaving cream/glue mixture.

Or, cover a cardboard cut out of a figure with tinted 3D Foam Paint. If you cut back on the shaving cream, or add a little extra paint, it dries to a nice leathery texture… great for painting dinosaur skin onto the cardboard shape of a dinosaur!


The possibilities are ENDLESS!


Paper Hydrangeas (aka Frilly Balls?)

These are 2 flowers glued together to form FRILLY BALLS!

Whether they are truly deserving of the name Paper HYDRANGEA is up to you. Maybe you prefer to think of them as Paper Frilly Balls?

REGARDLESS, they’re fun to make (at least I think so!) and can be used in a variety of different ways. Decorate gift boxes, attach to hair clips, or…

Spruce up an existing centerpiece!

Just keep in mind: Paper + Fire = Yowza!

Attach  to napkin rings, or attach the flower to wire and create your own ring!

Please pardon my horrible napkin rolling skills 😦

Get festive…make some decorative garland for the Holidays or your next party!

To make this, hot glue two hydrangeas together over ribbon, fishing line... etc.

Make a “flower” arrangement!

Yeaaa... obviously I just stuck those in there for the picture. But you get the idea!

… SO, are you a Hydrangea-FrillyBall-Fanatic yet?!

I COULD sit here and type some very detailed how-to instructions, complete with photographs & witty captions. OR, I could spare myself the trouble and pass the job on to someone else!

Just CLICK HERE, and if those instructions don’t do it for you, there are also a lot of how-to videos on YouTube that show you how to make these lovely little darlings.

If you try the link and you try the video instructions and you STILL can’t do it… give up. OR, find your crafty-est friend and have her (or him?) make it for you! Just smile your prettiest smile and politely say to them:  Hey, Try THIS [and give it to me when you’re done!]…”

My Big [Non]Fat Greek Yogurt Fruit Cream DREAM

Try THIS: Thick, Creamy (and good for you?!) Dessert!

Familiar with Greek Yogurt? If you are, then you know it was first brought to America by Jesse Katsopolis of Northern Greece. In the early 1990s, “Uncle Jesse”, as he became known, brought this luscious high protein, low-fat, thick and creamy yogurt to San Francisco to share with his three nieces who, at that time, were being raised by their single dad and his comedian friend. Due to its immense health benefits (and because Uncle Jesse still makes each batch in his big fat greek kitchen), Greek Yogurt is pricier than the other ethnic varieties of yogurt.

So, instead of buying individual small cups of fruit-on-the-bottom greek yogurt at $1-$2 a pop, make it yourself! Its CHEAPER, HEALTHY, and tastes more like DESSERT than yogurt. So, go on and TRY THIS….

Step ONE:  Gather the following…

  • Plain Greek Yogurt in a large tub
  • Sugar-Free Instant Pudding Mix (or regular, if you’re one of those who think artificial sweeteners will cause mutation)
  • Fruit (fresh, canned or frozen).

Unfortunately, this is not a paid advertisement for any of the above ingredients.

STEP 2: (Just mix ’em together!)

  • Dump the yogurt into another bowl (I used a 32 oz tub of yogurt)
  • Mix in about half of the Vanilla Pudding Powder (I used a 1.5 oz package)…. or til it tastes sweet enough for you. The Pudding mix will not only sweeten the yogurt, but will make it thicker, creamier and dreamier!
  • Add fruit (I used canned pineapple and one nectarine, sliced)
  • Say “WAH – LA!” (don’t leave this part out!)

Enjoy your creation and try to share it with loved (or liked) ones… but if you can’t find the courage to part with your bowl and spoon, just tell them: Hey, Try This…!